Your cart is currently empty!
How to Install a Dynacorn Quarter Panel on a 1971 Chevrolet Camaro: Step-by-Step Guide
Posted on: June 3, 2026 in Restoration Guides
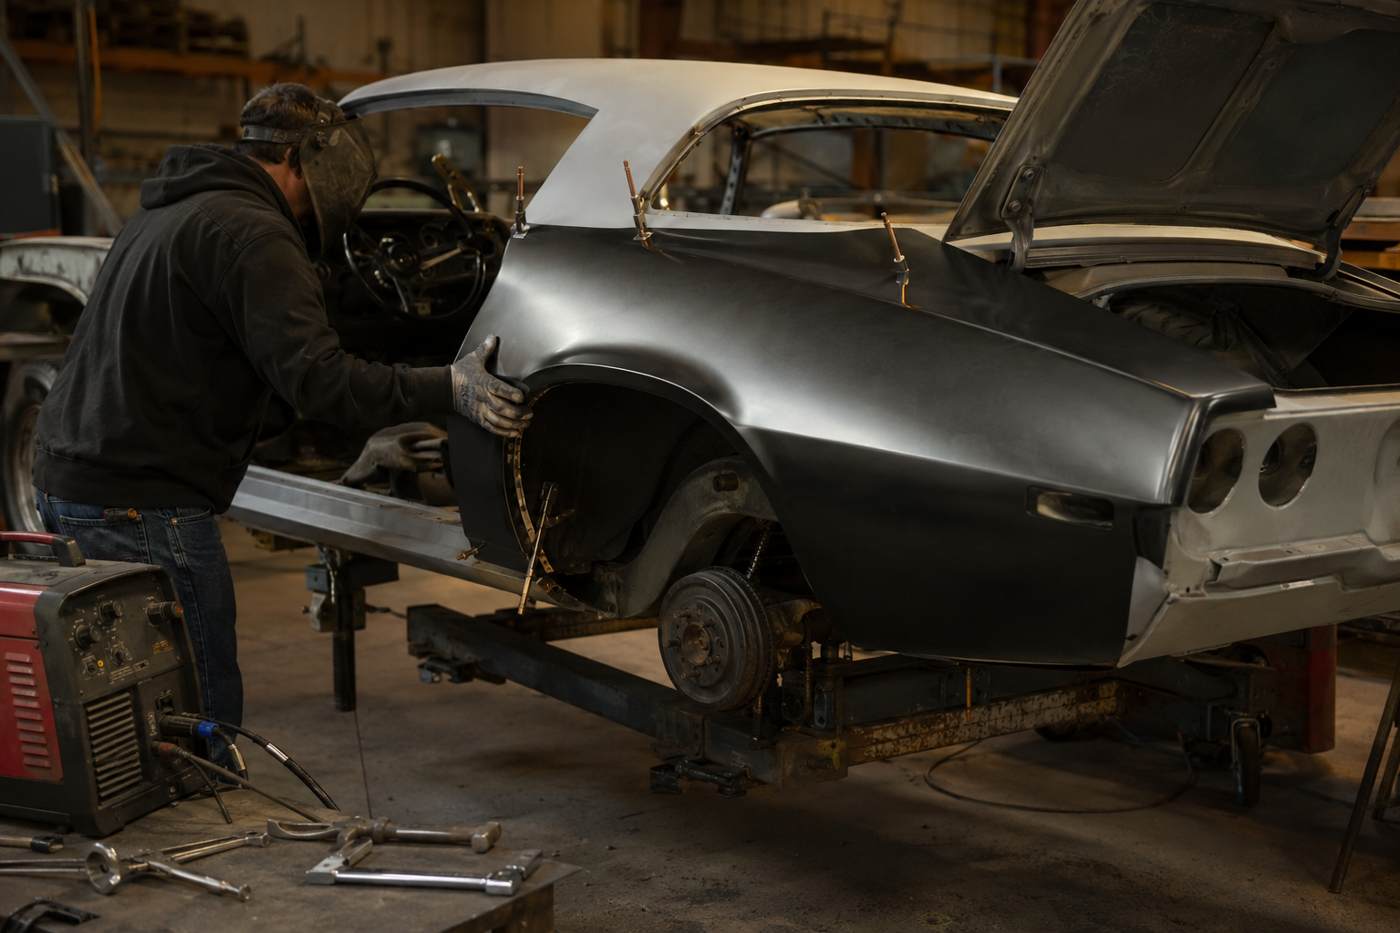
A dynacorn quarter panel chevrolet camaro 1971 installation is one of the most rewarding — and demanding — jobs in a second-gen Camaro restoration. Done right, it produces a structurally solid, rust-free quarter with factory-correct geometry. Done wrong, it causes door fit problems, water leaks, and paint failures that haunt the build for years. This guide walks through every step of the process, from pulling your tools together to sealing the finished seams, so you go into the job with clear expectations and a solid plan.
Classic Body Parts is an authorized Dynacorn dealer. You can source your quarter panel through us before you start — and if you have fitment questions at any point, our team is available by phone or chat.
Table of Contents
What You’ll Need
Having the right tools before you start prevents the most common mid-job mistakes. Quarter panel replacement is not a job to improvise with substitute tools.
Welding and Cutting
- MIG welder (minimum 140A, 180A or higher recommended)
- Auto-darkening welding helmet
- Plasma cutter or cut-off wheel with angle grinder
- Spot weld drill bit (3/8″ or 5/16″)
- Wire wheel and flap disc for the angle grinder
Body Work and Alignment
- Body hammer and dolly set
- Locking pliers / Vise-Grips (a dozen or more)
- Panel clamps / sheet metal clamps
- Door gap tool or feeler gauges
- Tape measure and machinist’s square
- Scribe or soapstone marker
Surface Prep and Finishing
- Wax-and-grease remover
- Rust converter or rust-encapsulating primer
- Weld-through primer (copper or zinc-based)
- Self-etching primer
- Seam sealer (paintable, flexible type)
- Cavity wax with application wand
Safety
- Welding gloves
- Fire extinguisher nearby
- Safety glasses
- Respirator rated for welding fumes and paint spray
Understanding the 1971 Camaro Quarter Panel
Before cutting anything, understand the full scope of what you’re replacing. The quarter panel on a second-generation Camaro is a large, complex piece of sheet metal that spans from the door jamb at the front, over the rear wheel well, and back to the tail panel. It includes the wheel well opening lip, the lower section that meets the rocker panel, and the distinctive body line that runs through the sail panel area.
You have two options when ordering: the full replacement quarter panel and the skin-only panel. The full panel replaces everything from the inner flange out — it’s the right choice when the inner wheelhouse, lower structure, or wheel well lip is also compromised. The skin-only panel overlays the outer surface and is appropriate when the underlying structure is still solid. Inspect your car carefully and choose the right panel before you start cutting.
Door gap is the most critical dimension affected by this job. The front edge of the quarter panel directly controls the gap between the door and the sail panel. If that gap is off, no amount of adjustment elsewhere will fix it. Keep a door in the opening throughout the entire installation.
Step 1 — Mark and Remove the Old Panel
Before you cut, establish your reference lines. With a scribe or soapstone, mark a line approximately two inches inboard from every seam — the door jamb, the roof rail, the trunk opening, and the rocker. These marks give you a buffer zone that preserves the factory flanges and inner structure during removal.
Use a spot weld drill bit to drill out every factory spot weld along the flanges. Count the welds as you go — you’ll typically find 40 to 60 spot welds on a quarter panel of this size. Work slowly and drill only through the outer panel, not into the inner structure below. Use a plasma cutter or cut-off wheel to cut through the body of the panel between your scribe lines and the seam. Protect adjacent panels — the roof, trunk lid opening, and door opening — with heavy blankets or sheet metal shields while cutting. Flying sparks will etch painted or primer-coated surfaces.
Once the bulk of the panel is free, use a hammer and chisel or a panel separator tool to break the remaining spot weld connections. Work carefully at the lower rocker area, which is structural, and at the sail panel area near the roof line. Pull the old panel completely clear and set it aside.
Step 2 — Clean and Prepare the Work Area
With the old panel removed, you’ll see the true condition of the inner structure. This is the point of no return — if the inner wheelhouse, lower frame rail, or inner rocker is compromised, address it now. Welding a new outer panel over rotten inner structure is a job you’ll redo in five years.
Grind all weld flanges clean with a flap disc until you’re down to bare metal. Any paint, primer, or seam sealer left on a flange will contaminate your welds and cause porosity. Use a wire wheel to clean inside corners and tight spots the flap disc can’t reach. Treat any surface rust you find with a rust converter or rust-encapsulating primer before proceeding. Allow the converter to fully cure per the manufacturer’s directions — typically 24 hours. Apply weld-through primer to all cleaned flanges at this stage and allow it to dry before bringing the new panel into position.
Step 3 — Dry-Fit the Dynacorn Panel
Do not weld anything yet. Clamp the Dynacorn quarter panel into position using locking pliers and panel clamps and spend as much time as the job requires getting the fit right before a single weld is made. This is the most important step in the entire installation.
Start by hanging a door in the opening. Set it to its correct gaps at the front and adjust the quarter panel position until the door-to-quarter gap is consistent from top to bottom — typically around 3/16″ to 1/4″. Then check the deck lid (trunk lid) gap at the rear quarter edge. The deck lid gap and the door gap must both be correct simultaneously before you commit to welding. Check that the body line through the sail panel runs straight and continuous from the door into the quarter. Mark any trim lines that need adjustment with a marker. If the panel needs slight trimming at the roof flange or the trunk flange, do it now with a grinder or body saw — not after welding.
Step 4 — Tack Weld and Verify
With the panel clamped and dry-fitted to satisfaction, begin tacking. Start at the front of the panel — the door jamb flange — with tack welds spaced about six inches apart. Do not stitch the entire front edge before moving on. Instead, place a few tacks at the front, a few at the rear, and a few in the middle, working in a balanced pattern that allows you to continue making small adjustments.
After every set of tacks, recheck the door gap at the top and bottom of the opening using your door gap tool. The gap should remain consistent throughout the tacking process. If it begins to close at the top or open at the bottom, the panel is rotating slightly — release a clamp or two and reposition before continuing. Use a door gap tool or feeler gauges rather than eyeballing — your eyes will lie to you after a few hours in the shop.
Tack the wheel well lip into position with the wheel installed if possible, or use a cardboard template of the wheel arc to verify clearance. The wheel well lip must clear the tire with the suspension at full compression.
Step 5 — Complete the Weld
Once the panel is fully tacked and all gaps are verified, complete the weld using a stitch weld technique. Do not run a continuous bead along any seam — the heat will warp the panel and pull your door gaps out of alignment. Instead, weld one-inch segments spaced approximately six inches apart, then move to the opposite end of the panel and weld the next set of one-inch segments.
Alternate from front to rear, top to bottom, and side to side throughout the entire weld-out. This heat management strategy is the single most important factor in keeping the panel from warping after final welding. Allow each stitch segment to cool to the touch before welding adjacent segments. Use a wet rag to accelerate cooling if needed, but apply it only after the weld has solidified — never quench an active weld.
After the stitch welds are complete and fully cooled, planish each weld with a body hammer and backing dolly to bring it flush with the surrounding panel surface. This step makes final grinding much easier and reduces the risk of grinding through the panel.
Step 6 — Seam Seal and Prime
Grind all exterior welds flush using a flap disc, working carefully to avoid thinning the surrounding panel. Follow with 80-grit on a DA sander to blend the area smooth. Inspect every seam for pinholes and re-weld any gaps before proceeding to seam sealer.
Apply paintable seam sealer to every interior seam — the roof flange, the door jamb flange, the rocker seam, and the trunk opening flange. Use a caulking gun for large seams and a brush-applied seam sealer for tight areas. The seam sealer prevents water intrusion into the panel cavity, which is where rust starts. Before closing up the inner wheelhouse, insert a cavity wax applicator wand and apply cavity wax to the inner structure, the inner quarter cavity, and the inner wheelhouse. This is the wax that protects the areas you will never be able to reach again.
Apply self-etching primer to all bare metal surfaces on the exterior and interior of the panel. Allow to cure fully before block sanding and applying bodywork filler. The quarter is now ready for finish bodywork and final paint prep.
Common Mistakes to Avoid
1. Skipping the dry-fit. This is the most expensive mistake in panel replacement. Welding before the gaps are verified means cutting out a welded panel and starting over. Always dry-fit completely before tacking.
2. Welding too fast and warping the panel. Running long continuous beads generates heat that distorts thin sheet metal across large distances. Stitch weld and alternate sides every time. There are no shortcuts to managing heat.
3. Not treating rust in the inner structure. Welding a beautiful new outer panel over a rusting inner wheelhouse guarantees the rust will return. If the inner structure isn’t solid, repair or replace it before the outer panel goes on.
4. Incorrect door gap. A door gap that is right at the top but wrong at the bottom — or vice versa — indicates the panel is cocked in the opening. Catch this during tacking, not after full weld-out.
5. Skipping cavity wax on the inner structure. The inner quarter and inner wheelhouse will never be accessible again after the panel is welded. Cavity wax is the only corrosion protection those areas will ever receive. Do not skip it.
Frequently Asked Questions
Q: Should I use a full replacement quarter panel or just the skin? If your inner wheelhouse, lower frame extension, or wheel well lip is compromised, use the full replacement panel. If the inner structure is solid and the rust is limited to the outer skin, the skin-only panel is a faster and less expensive repair. When in doubt, pull the inner trim panel before ordering and probe the inner structure with a screwdriver — solid steel doesn’t flex or puncture under hand pressure.
Q: Butt weld or lap weld at the seams? A butt weld produces a stronger, thinner joint that requires less filler to finish, but it demands more precise cutting and fitting. A lap weld is more forgiving on the cutting and clamp-up but leaves a ridge that requires more bodywork. For a show or driver-quality build, butt welds at the major visible seams are worth the extra effort. Flanged overlap joints at the roof and trunk are typically factory-correct and should be maintained.
Q: What about the door jamb area — does the quarter panel include the jamb? The full quarter panel includes the flange that overlaps with the door jamb, but it does not replace the door jamb itself. The door jamb is part of the body structure and is typically solid even on heavily rusted cars. If your door jamb is compromised, address that separately before installing the quarter. The quarter panel flange welds to the outer edge of the door jamb, so both surfaces must be clean and solid for a proper joint.
Buy Your Dynacorn 1971 Camaro Quarter Panel at Classic Body Parts
Classic Body Parts is an authorized Dynacorn dealer carrying the complete 1971 Camaro quarter panel lineup — full replacement and skin, coupe and convertible. Our pricing is competitive, our panels are genuine Dynacorn, and our team knows these cars.
Shop Dynacorn 1971 Camaro Quarter Panels
For welding technique guidance, the Miller Welds article library is an authoritative resource covering MIG setup, heat management, and panel welding best practices.
Ready to start your build? Call or chat with us and we’ll confirm the right panel for your car before your order ships.
Classic Body Parts is an authorized Dynacorn dealer. Questions about fitment? Call or chat with us.
Related Articles

Why Classic Car Restorers Trust OER for Accurate Reproductions
When working on a classic car restoration, reproduction parts fill gaps where originals are gone or too damaged to reuse. […]

Understanding Firebird Body Panel Differences by Model Year
Restoring a Firebird is about more than just getting the car to look how it did when it rolled off […]

How to Avoid Sheet Metal Warping When Painting in Heat
Summer’s a good season for paint work, but high temperatures can quickly work against us. When we’re dealing with classic […]